What is Composr? #
Composr is a very flexible CMS with advanced social interactive and dynamic functionality. This Content Management System is a web application for creating a website and it is a combination of a web content management system and online community (social networking) software.
It is written in PHP programming language and licensed as free software under the terms of a common public attribution license. It is available on various web application distributors, like installation, Softaculous, Web platform installer, and Bitnami.
It was launched on 20 June 2004 as a portal. 100s of features are available out of the box with many social media features and building blocks and further addons. It is embraced by fortune 100 companies, government agencies, and small startups.
Top requirements of Composr #
- MySQL 5.5.3 or higher
- Apache, IIS, or Nginx
- 50 MB of disk space
- PHP 5.1 or higher with GD2 and a minimum memory limit of 32 MB.
Top benefits of Composr #
- It can be thoroughly customized
- It has no licensing costs
- So many website features are available out of the box
- 100s of pages of docs freely available, plus video tutorials
- Composer runs on almost any PHP webserver
Top Features #
- Advertising management
- File management
- Content management of website structure and page
- Content management of custom content types
- Blogging and news
- Chat Rooms
- Galleries
- Calenders
- Discussion Forums
- Newsletters
- Community points
- Strong plugins integration
Some unique features #
- Core integration with a spammer block list
- Automatic banning of hacker
- Automatic color scheme generation using color theory
- Integration with third-party forum software for user accounts and forums
How to How to install Composr using Softaculous #
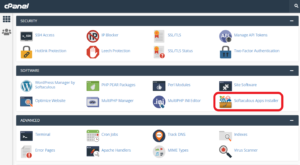
Step 1. Go to cPanel
Step 2. Under the software, section click on the “Softaculous App Installer” button
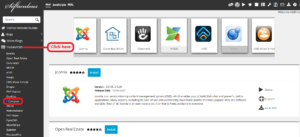
Step 3. On this window, you see a sidebar on the left side select “Portal/CMS” then scroll down to the “Composr” click there
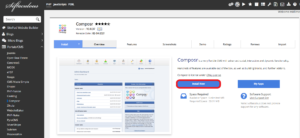
Step 4. After clicking open new interface here click on the “Install Now” button
Step 5. On the new window, you fill in the information
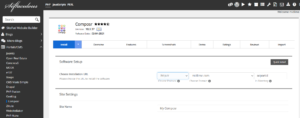
Step 6. First, choose the installation URL
Step 7. Next box choose Protocol
Step 8. Then next box Choose the Domain
Step 9. Then choose in a directory
Step 10. Then write the site name
Step 11. Then Create your administrator user name, password, then enter the real name
Step 12. Write user Email in the Email box.
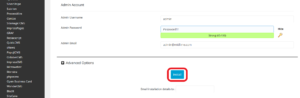
Step 13. Click on the install button at the bottom of the page
Step 14. You will get confirmation of successful installation on the interface.

Visit us hostrik.com


