What is Piwigo? #
Piwigo is open source photo gallery software for the web designed for organizations, teams, and individuals.
Why use Piwigo? #
- High volume – It comes to classifying thousands or even hundreds of thousands of photos.
- Sustainable – It release in 2002, it will be supporting its users for more the 19 years.
- Open source – Source code is available, auditable, editable, and extendable because of plugins and themes.
Powerful Features of Piwigo #
It offers a wide set of features for any photo gallery. New features are added on an ongoing basis, because of coding team ideas and discussions with the user community.
- Batch manager – Filter photos, make the selection, and apply action in using batch; change author, add some tags, associate to a new album, set geolocation.
2. Upload your photos – You can upload photos with the web form, an FTP client, or a desktop application like digiKam, Shotwell, Lightroom, or mobile application
3. Theme & Plugins – Using themes you can change the appearance and using plugins you add many more features. 350 extensions available and it requires just a few clicks to get installed.
4. Geolocated your photos on a map – Using embedded metadata it can read GPS latitude and longitude. Then using the plugin for Google Maps or OpenStreetMap, it can display your photos on an interactive map.
5. Full-screen slideshow – Using the fotorama plugin or specific themes like Bootstrap Darkroom, you can see the full-screen slideshow.
Advantages #
- Easy installation and updates – It is designed to be super easy to install, with minimum requirements, and update with a single button click.
- A great place for your visitors – Visitors can post comments, give ratings, mark favorite photos, perform searches, and get notified of news by email.
- Import automatic your metadata – IPTC description can be imported into photo properties, displayed next to the photo, and searchable.
- User management – Many more administrators can work at the same time and they can create users, groups, manage permissions and send notifications.
Most Recent Extensions #
- PresyncAutoRuename (29/04/2021)
- Bootstrap Darkroom (27/04/2021)
- LocalFiles Editor (23/04/2021)
- Look_Like_Gbo 2 (21/04/2021)
- SimpleNG (09/04/2021)
Latest Version of Piwigo #
- Piwigo 11.4.0. March 19th, 2021
- Piwigi 11.3.0. February 6th, 2021
- Piwigo 11.2.0. January 22nd, 2021
Requirements #
Piwigo requires web hosting to run, and it uses for a photo gallery solution with all included installation, hosting backup, and it simply wants to try Piwigo with no installation on you open a free trial account on piwigo.com.
Minimum requirements
- A web server like Apache
- MySQL 5.6 + or Maria DB 10.1 +. MySQL 5.0+ works but is not longer maintined
- A graphic library: ImageMagick is recommended for its performance and image quality but GD often bundled with PHP can also do the job.
- FTP client software will be required to upload the files. It recommended FileZilla FTP client software is provided free for Piwigo and compatible with Windows, Mac, and Linux.
- PHP 7.3 +. Piwigo can run with PHP 5.3+ but these versions are no longer maintained and it exposes your site to security vulnerabilities like the officially PHP supported version.
- It gives you Enough disk space for your pictures and you can upload additional photos, it will store the “multiple sizes” in a cache directory of your server.
Optional Requirements
- FFmpeg is required for plugin videoJS to create a video poster.
- Exiftool is required for plugins Write Metadata or any other plugin dealing with EXIF/IPTC Metadata.
- Pdftoppm will be recommended to generate poster from PDF files (instead of ImageMagick)
Installation – Using Sooftaculous
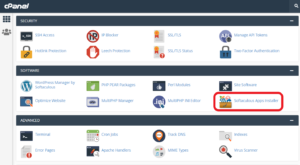
Step 1 – Go to your cPanel
Step 2 – Go to the software section
Step 3 – Click on the Softaculous icon
Step 4 – Search Piwigo under Image Galleries in the left sidebar
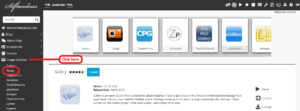
Step 5 – Click on the Install now button

Fill the information
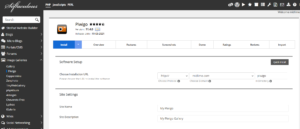
Step 6 – If your site has SSL, select HTTPS as protocol.
Step 7 – Choose the domain where you want to install it
Step 8 – Enter a directory and database name
Step 9 – Enter a site name and site description
Step 10 – Enter an Admin Username, Admin Password, and Admin Email
Step 11 – Click the bottom of the page Install button
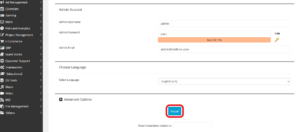
Step 12 – Then you get a message that will confirm that the installation was successfully done.
Visit us hostrik.com


