What is LiteCart? #
LiteCart is a new innovative free shopping cart platform developed in PHP. It was founded by Swedish developer T. Almorth and it is based on the latest modern technology such as PHP 5.3+, jQuery, HTML 5, and CSS3. That is a logical design and a simple-to-use interface. This platform is constructed to be lightweight and easy for developers to modify and build upon.
It is a free eCommerce platform that is made to help provide you with the tools needed to start selling products online. It helps to ensure you are getting a clean and efficient platform that will work on any browse whether it is a PC, MAC, Mobile Phone, Tablet, or anything else.
Features of LiteCart #
- Easy to install
- Super high performance
- Modern technology
- Extremely easy to use
- Logical user interface
- Easy to navigate
- Lightweight
- Reduced amount of mouse click
- Modern interface
- Easy to modify
- Unique framework
- Unlimited products
- Multiple languages
- ISO codes
- Plug’n play admin apps
- Unlimited categories
- Multiple currencies
- Fixed prices per currency
- Order editor
- Search Engine friendly
- One-step checkout
- Multiple product images
- Injunction based translations
- Faster page loading
- No third party dependencies
- Mobile friendly
Requirements of LiteCart #
- Apache 2
- PHP 5.3+
- MySQL 5.5.+
- PHP 7+ recommended
- An FTP account
- A zip archive of LiteCart downloaded from litecart.net
How to install LiteCart using Softaculous #
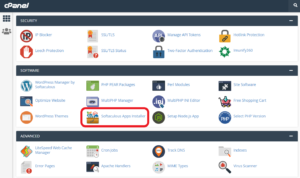
Step 1. Go to cPanel
Step 2. Under the software, section click on the “Softaculous App Installer” button
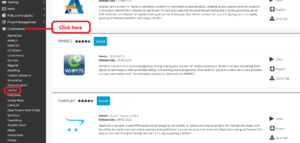
Step 3. On this window, you see a sidebar on the left side select “E-Commerce” then scroll down to the “LiteCart” click there
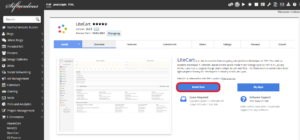
Step 4. After clicking open new interface here click on the “Install Now” button
Step 5. On the new window, you fill in the information
Step 6. First, choose the installation URL
Step 7. Next box choose Protocol
Step 8. Then next box Choose the Domain
Step 9. Then choose in a directory
Step 10. Then type Site name
Step 11. Next box you select the admin folder
Step 12. Then select country
Step 13. Then next box type timezone
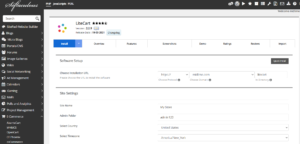
Step 14. Then Create your administrator user name, password, then enter the real name
Step 15. Write Email in the Email box.
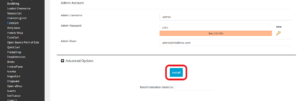
Step 16. Click on the install button at the bottom of the page
Step 17. You will get confirmation of successful installation on the interface.
Visit us hostrik.com


