What is Elgg? #
Elgg is open-source social networking software, written in PHP. It provides individuals and organizations with the components needs to create an online social environment. It was the first platform to bring ideas found in commercial social networking platforms to educational software. It offers blogging, microblogging, file sharing, networking, groups, and a number of other features.
It is free to download and use. Its new version Elgg 2.x wax released in 2018. It is licensed under the terms of the GNU General Public License (GPL). It runes on the LAMP Platform ( L- Linux, A- Apache, M- MySQL, P- PHP). It is a highly customizable web framework and Content Management System (CMS) for building social apps with PHP and MySQL.
Top features of Elgg #
- Flexible system of hooks and events
- User authentication
- Flexible entity system
- Security
- Client-side API
- Groups
- File storage
- Notification services
- Access control system
- Opinionated data model
- Cacheable system of static assets
- Composer
- Well-documented core API.
Top Requirements of Elgg #
- MySQL 5 +
- PHP 5.5 + with the extension:
- GD (For graphics processing)
- Multibyte string support (for i18n)
- Proper configuration and ability to send email through an MTA
- Web server with support for URL rewriting
- Official Support:
- Apache Server
- Apache with the rewrite module enabled
- PHP running as an Apache module
2. Nginx server
- Nginx with PHP-FPM using FastCGI
- Browser Support:
- Android Browser
- Chrome
- Firefox
- IE
- Safari
Other Configurations: #
- Easy PHP
- IIS
- XAMPP
- Cloud9
- Virtual host
- MAMP
- MariaDB
- Ubuntu
How to install Elgg using Softaculous #
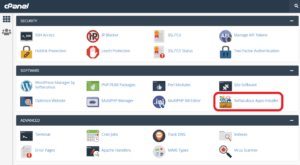
Step 1. Go to cPanel
Step 2. Under the software, section click on the “Softaculous App Installer” button
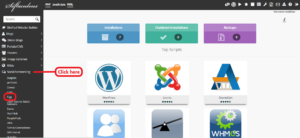
Step 3. On this window, you see a sidebar on the left side select “Social Networking” then scroll down to the “Elgg” click there
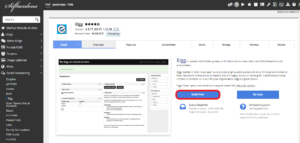
Step 4. After clicking open new interface here click on the “Install Now” button
Step 5. On the new window, you fill in the information
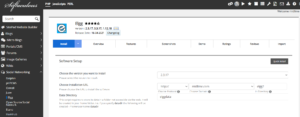
Step 6. First, choose the version you want to install
Step 7. Second, choose the installation URL
Step 8. Third, Choose the data directory
Step 9. Then write site name and site description
Step 10. Then Create your administrator user name, password, then enter the real name
Step 11. Write user Email in the Email box.
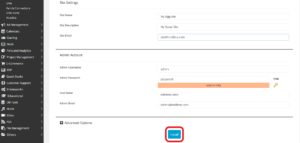
Step 12. Click on the install button at the bottom of the page
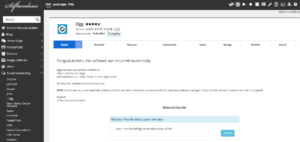
Step 13. You will get confirmation of successful installation on the interface.
Visit us hostrik.com


